
I think everyone who owns a backyard in Central Ohio has had “The Dream.” It usually hits on a hot, humid day in August. You’re sitting outside, listening to the cicadas, and you start to imagine a patch of your lawn replaced by sparkling, cool blue water. For years, that’s all it was for us—a vague, hazy dream. When we finally decided to get serious about it, my first thought was to look through brochures and pick a shape, like choosing a car from a lot.
I quickly realized how wrong I was. Our backyard wasn’t a perfect square, our family’s needs were unique, and the cookie-cutter swimming pool options just felt… impersonal. They didn’t fit our home, our lifestyle, or our vision. That’s when we discovered the world of custom pool design. It was the key that unlocked everything, transforming our simple dream of a pool into the incredible backyard oasis we live in today.
This is the detailed story of that journey. It’s a step-by-step guide through the creative process, from the initial, intimidating measurements of our yard dimensions to the final, joyful moments of landscape integration. We’ll explore how a truly functional design is born, how to achieve breathtaking aesthetic appeal, and all the crucial design considerations we learned along the way. If you’re dreaming of creating an outdoor space that is uniquely yours, this is for you.
Step 1: Taking Stock of Our Canvas – Understanding Yard Dimensions and Outdoor Space
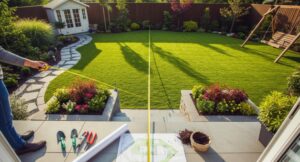
Before a single line was drawn, our journey began with a hard, honest look at our backyard. You can’t design a masterpiece without first understanding your canvas. For us, this meant moving beyond just a casual glance and getting into the nitty-gritty of our property.
The Importance of a Professional Site Survey
My initial “measurement” of our yard involved pacing it out and declaring, “It’s pretty big!” Our designer, thankfully, was a bit more scientific. The first official step was a professional site survey. This detailed map of our property was the foundation for every decision that followed. It showed us:
- Precise Yard Dimensions: We learned the exact length and width of every part of our yard, not just the general shape.
- Topography: Our yard had a slight, almost unnoticeable slope. A standard pool would have required a massive, ugly retaining wall. A custom pool design allowed us to build a multi-level patio that worked with the slope, creating a much more interesting outdoor space.
- Utility Lines: The survey marked the location of buried gas, water, and electrical lines. Trying to guess this would have been a dangerous and costly mistake.
- Sun and Shade Patterns: We spent a weekend tracking the sun. We noted which parts of the yard got full sun in the morning versus the afternoon. This was critical. We wanted our tanning ledge to get peak afternoon sun, but we also wanted a shady spot on the patio for dining.
- Sightlines: The designer had us stand at our kitchen window, our patio door, and our bedroom window. The views from these spots would become the “live paintings” we’d look at every day. A custom design allowed us to orient the pool and its features to be perfectly framed from inside our home.
Working with Setbacks, Easements, and Other Limitations
Every property has rules. The survey revealed a utility easement along the back of our property where we couldn’t build anything permanent. At first, this felt like a huge constraint. However, this is where the power of custom pool design really shines. Instead of just shrinking the pool, our designer used the easement as a natural border for a beautiful garden bed, creating a lush, green backdrop that we wouldn’t have otherwise considered. These limitations often force the most creative solutions.
Step 2: Function First – Creating a Truly Functional Design
A beautiful pool that doesn’t fit your lifestyle is just a pretty water feature. The most important part of the custom process is designing the pool around how you will actually live in it. A truly functional design is a comfortable design.
Answering the “Why” of Our Pool
Our designer played the role of a family therapist, asking us to envision our perfect pool day.
- My Vision: Quiet morning coffee by the water’s edge, maybe some light lap swimming.
- My Spouse’s Vision: Hosting lively weekend barbecues with friends, lots of seating in and out of the water.
- The Kids’ Vision: Endless cannonballs, Marco Polo, and a place for their friends to hang out.
These different needs had to be harmonized. The result was a “zoning” approach to our functional design. We created a long, straight section for laps on one side. The other side became the “social zone,” featuring a large tanning ledge and wide, built-in benches. The deep end was kept open and free of obstructions for safe cannonballing. Every square inch had a purpose.
Customizing the Details: Ledges, Benches, and Entry Points
This is where custom design truly separates itself from standard options.
- The Tanning Ledge: Standard ledges are often small. We designed ours to be a massive 10×8 foot space, specifically measured to fit two lounge chairs and a small umbrella. We also set the depth at 12 inches—deep enough to be cooling but shallow enough for our youngest to sit and play comfortably.
- The Benches: Instead of a single small bench, we designed a long, L-shaped “conversation pit” in the shallow end. It’s now the most popular spot for adults during parties.
- The Entry Points: We wanted grand, inviting steps, not a cramped ladder. We designed wide, wedding-cake style steps that also serve as extra seating. For safety and convenience, we added a small “cuddle cove” step in the deep end, providing an easy exit point without needing a ladder.
Step 3: Unleashing Creativity – Choosing the Perfect Pool Shape and Size
With the practical and functional aspects mapped out, it was time for the fun part: defining the actual look of the pool.
Breaking Free from the Rectangle: Exploring Pool Shape
For a moment, we were tempted by a wild, curvy, lagoon-style pool shape. It looked so natural and inviting in pictures. But then we went back to our “why.” A freeform shape would make lap swimming difficult. This is a key design consideration: the pool shape must serve the function.
We settled on a geometric design. It’s fundamentally a rectangle, which is perfect for swimming, but we customized it with an offset tanning ledge and an inset spa, creating interesting lines and visual appeal. This gave us the best of both worlds: the functionality of a rectangle with the unique look of a custom shape. It perfectly complemented the modern lines of our home, enhancing the overall aesthetic appeal.
Getting the Pool Size Just Right
Bigger isn’t always better. My initial impulse was to maximize the pool size to fill the available space. Our designer wisely talked me down. A massive pool would have overwhelmed our yard, leaving little room for the patio, garden, and green space needed to create a balanced outdoor space.
We learned that pool size is a delicate balance between:
- Yard Dimensions: The pool shouldn’t feel cramped. You need ample space around it for walking, lounging, and landscaping.
- Bather Load: How many people will be using the pool at once? A pool for a family of four is different from a pool designed for hosting 20-person parties.
- Budget: A larger pool costs more to build, more to fill, more to heat, and requires more chemicals.
We ended up with a pool that was about 15% smaller than my initial sketch, but it feels perfect. The generous patio and garden space around it make the entire backyard oasis feel larger and more luxurious than if we had just opted for a giant basin of water.
Step 4: The Art of Integration – Focusing on Aesthetic Appeal and Landscape Integration
A custom pool shouldn’t look like it was just dropped into your yard. It should look like it has always been there, perfectly integrated with your home and its surroundings.
Matching the Pool to Our Home’s Style
The aesthetic appeal comes from creating a cohesive look. We pulled design cues directly from our house.
- Coping: The coping is the stone or concrete edge that caps the pool shell. We chose a natural travertine coping in a light cream color that matched the stone accents on our home’s exterior.
- Waterline Tile: We selected a simple, elegant glass tile in shades of blue and gray that complemented our home’s color palette.
- Interior Finish: Instead of a standard white plaster, we opted for a pebble-finish in a medium gray. This gives the water a deep, rich, natural blue color that looks much more sophisticated than the bright aqua of a standard finish.
These material choices were small details in the grand scheme, but they made a huge difference in tying the entire project together.
Seamless Landscape Integration
This is where a good design becomes a great one. Landscape integration is about blurring the lines between the pool, the patio, and the garden.
- Planting Pockets: Instead of just having a hard patio edge all the way around, our designer incorporated “planting pockets”—small garden beds cut directly into the patio. This allowed us to bring lush greenery right up to the water’s edge, softening the look.
- Layered Planting: We worked with a landscape designer to create a multi-layered planting plan around the pool. Low, flowering perennials were planted closest to the patio, followed by medium-sized shrubs, and finally, a row of taller evergreen trees at the back of the property to create a private, green wall.
- Continuity of Materials: We used the same travertine from the pool coping to create caps for our new retaining walls and steps, creating a consistent and harmonious look throughout the entire outdoor space.
Step 5: Exploring All Swimming Pool Options – Final Design Considerations
As we finalized the design, there were a few more key swimming pool options and design considerations that made a huge impact.
- Water Features and Lighting: We designed these in from the start. We added three sheer descent waterfalls on a raised wall, which provides a soothing sound and a beautiful visual. The LED lighting plan was also comprehensive, with lights in the main pool, on the tanning ledge, and even highlighting the waterfalls.
- Equipment Placement: This is a crucial functional detail. You don’t want a noisy pool pump right next to your seating area. We designed a small, fenced-off nook on the side of the house to hide the equipment, keeping it out of sight and sound.
- Future-Proofing: We had our contractor run extra electrical conduit under the patio to a spot where we might one day want to add an outdoor kitchen or a pergola. Thinking ahead during the design phase is easy and cheap; adding it later is a nightmare.
Bringing It All Together: Our Custom Backyard Oasis
The day our pool was finished and filled, I stood at my kitchen window, looking at the same view I had for years, but now it was completely transformed. It was the exact vision we had crafted over months of planning, a space that was perfectly suited to our family.
The journey of custom pool design was far more involved than I ever imagined, but it was also incredibly rewarding. It allowed us to be creative, to solve problems, and to build something that was truly an extension of our home and our lives. A standard pool would have just been a place to swim. Our custom pool is the heart of our home, our private resort, our backyard oasis.
Comprehensive FAQ on Custom Pool Design
How much more does a custom pool design cost than a standard one?
This is a common misconception. The “design” phase itself doesn’t necessarily add a huge cost. The price of a pool is determined by its size, materials, and features, not whether it’s “custom” or “standard.” A simple custom-shaped vinyl pool can be less expensive than a large, feature-rich standard fiberglass model. The benefit of custom design is that it allows you to control the budget by allocating funds to the features that matter most to you, rather than paying for a standard package with elements you don’t want.
I have a small or awkwardly shaped yard. Am I still a candidate for a pool?
Absolutely! This is where custom pool design is not just a luxury, but a necessity. A skilled designer can create a “spool” (a small pool/spa hybrid), a plunge pool, or a narrow lap pool that can fit into surprisingly tight spaces. They can design a pool that perfectly follows the contours of an unusual yard dimension, turning a challenging space into a unique and stunning feature.
What are the biggest mistakes people make during the pool design phase?
- Underestimating the Patio: Not planning for enough deck space around the pool is the #1 regret of new pool owners. You need room for furniture, foot traffic, and safety.
- Forgetting about Function: Falling in love with a pool shape that looks cool but doesn’t fit how you will actually use the pool (e.g., a curvy pool for someone who wants to swim laps).
- Ignoring the Surroundings: Not considering sightlines from the house, sun/shade patterns, and landscape integration, which leads to a pool that feels disconnected from the rest of the property.
- Not Planning for the Future: Failing to run extra conduit for future features like an outdoor kitchen, a fire pit, or landscape lighting.
How important is the interior finish to the overall aesthetic appeal?
The interior finish is one of the most impactful choices you will make. It determines the color of your water and the overall mood of your pool. A standard white plaster gives a classic, bright aqua look. A light gray or blue finish provides a richer, more natural blue. A dark gray or black finish creates a deep, dramatic, lagoon-like effect with a highly reflective surface. Test samples in water and sunlight before making your final decision.
Can I incorporate a spa into my custom pool design?
Yes, and there are many ways to do it. A “spillover spa” is a popular option, where a raised spa is integrated into the pool structure and the water cascades into the pool, creating a beautiful water feature. You can also design a spa that is level with the pool or even a separate, standalone spa that shares the same equipment pad. Integrating it into the initial functional design ensures a seamless look and operation.